Using Google Tag Manager
Google Tag Manager is a solution created to manage tags in a user friendly way. By tags we mean custom images and HTML as well as Javascript snippe...
A data layer is a piece of code that contains all the information that you want to send to your Google Tag Manager. As an example, imagine that you set a remarketing tag event that would trigger when a visitor clicks on a product. The variable saying (x_product_clicked = “yes”) would be stored in the data layer. But before we can go any further, there is an important distinction that needs to be made between pre-populated values in data layers and pushed values to data layers.
<script>
  dataLayer = [{
    'tripCategory': 'hiking' ,
    'tripLocation': 'Switzerland'
  }];
</script>
This piece of code sets the tripCategory of a certain page as ‘hiking’ and tripLocation as ‘Switzerland’ in the data layer right when the page loads up.
This implementation of data layers is not recommended because it is prone to errors (you have to paste the data layer code above the Google Tag Manager container snippet or else, the All Pages triggers will breakdown) and, as it overwrites the values in the dataLayer, it may lead to failure to connect with Google Tag Manager, not triggering your variables.
<script>
window.dataLayer = window.dataLayer || [];
  window.dataLayer.push({'event': 'new_subscriber'});
</script>
In this case, a Data Layer event is fired once a new subscriber has successfully entered his/her email on your website
You may have noticed that, in this case, window. was added before dataLayer, this is meant to allow this piece of code to be placed above or below the Google Tag Manager container and not break the connection with Google Tag Manager.
It is recommended because it can be pasted above or below the Google Tag Manager container snippet without causing any problems.
Start by going to Themes > Code Editor

After that, go to LAYOUT and write after {% include 'schema' %}:
{% include 'data_layers' %}
Click on save changes, and after that, click on new file.
Now you can write your data layers in this file like this example:
{% case template %}
{% when 'form' %}
<script>
window.dataLayer = window.dataLayer || [];
window.dataLayer.push({
 'formLocation': ‘footer’,
 'event': 'new_subscriber'
 });
</script>
When you are done, click on “Save changes” with the filename as: data_layers.liquid
You can also check the liquid template documentation
Go to your Google Tag Manager account, if you don’t have one already you have to configure it and connect it to your website. After that, go to Variables > User-Defined Variables - New and choose Data Layer Variable
Set the data layer variable name as one of the variables you named in your data layer, in this case it can be formLocation.

After saving, go back to the main page of Google Tag Manager and click on Tags > New
Tag Configuration > Google Ads Remarketing and name the tag as: Google Ads Remarketing Tag
Now, fill out the Conversion ID and Conversion Label (if you don’t know this two values, you can check out google quick guide on how to get them)
Now you can click on save.

Go to triggering > + sign
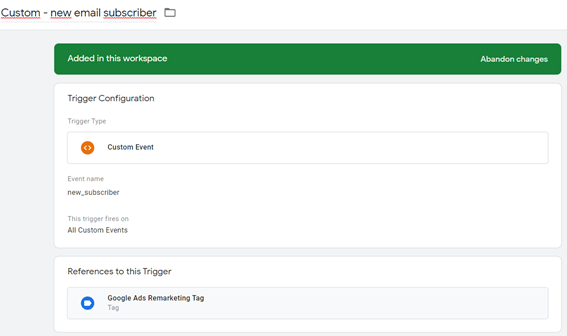
Click on trigger configuration > Custom event
Eventname in this case id new_subscriber and keep the option All custom events.
Name this trigger as Custom - new email subscriber

And that is it, you can now click on save, go back to the admin panel and click on preview to test out your tag and trigger.
If you have any questions regarding all of this, you may contact us any time and we will be happy to assist you.
Free trial for 14 days. No credit card required.