Products Admin Panel On Your Online Store
Get to know all the features available in the product admin panel of your store to get the most of it.
An important aspect of starting an online business is adding and listing your products. The product page is where browsing turns into buying, so it is worth getting right. The good news: you do not need to fill in every field to publish a product, and you do not need to be technical to build a page that sells.
This is the complete guide to configuring a product in Jumpseller. If you are just starting out, read it top to bottom and follow each step. If you already know your way around, use the table of contents to jump straight to the section you need — pricing, options, digital files, SEO, and so on.
Different products need different configuration. To make that concrete, we’ll follow three very different examples through every section of this guide:
Whenever a field matters more for one type of product than another, we’ll point it out.
To access the Products section, go to Admin Panel: Products > All Products. If there are no products yet, you’ll see a “No Products Yet” message. You can add products manually, or import them using a CSV file with your existing product list.

If there are products already listed, click “Add Product” in the top right corner to add a new one.

Once you’re in the product creation view, you’ll see several sections with input fields. Let’s go through them in the order you’ll use them.
Every product listing begins with a name. It’s the first thing a customer reads and the single field that most affects whether your product is found — both on your own store’s search and on Google.

A good product name is simple, relevant, unique, descriptive, and SEO-aware. It should be easy to remember and search for, give a clear idea of what the product is, distinguish it from competitors, and include the words people actually type when looking for it. Here is why each principle matters:
A strong eCommerce title includes the brand, the product type or model, key features, and any attribute that helps a customer decide.
Bad names:
Good names:
Applied to our three examples: “Nike Air Max 270 — Men’s Running Sneakers”, “Complete Online Photography Course — Beginner to Pro”, and “Personalised Birthday Cake — Made to Order” all tell the customer and the search engine exactly what they’re getting.
A good name not only improves the customer experience, it optimizes our product search and recommendation algorithms.
For each product you can upload as many images as you need. The first image (top-left) is the main image and, depending on your theme, the largest one shown.

To change the main image, upload it and drag it to the first position. You can reorder the whole list by dragging.
Photography is doing real persuasion here, so make it comprehensive. For the sneakers, show multiple angles, the sole, and the shoe on a foot for scale. For the course, a clean cover image plus a screenshot of the lessons reassures the buyer there’s substance behind a digital product. For the cake, show several finished designs so customers can picture their own. You’ll see later that variants (like each sneaker color) can have their own images too.
Product categories organize your catalog and make browsing easy. They also improve the effectiveness of our search and recommendation algorithms. You can select existing categories or create new ones.
Group products by descriptive attributes. A clothing store might create Men and Women categories, each with subcategories like Pants, Shirts, Skirts, Dresses. You can create categories for products on sale, by brand, by size or color, or by type (rings, necklaces, earrings). Our sneakers would sit under something like Footwear > Running.
Go to Admin Panel > Products > Categories > Add Category.
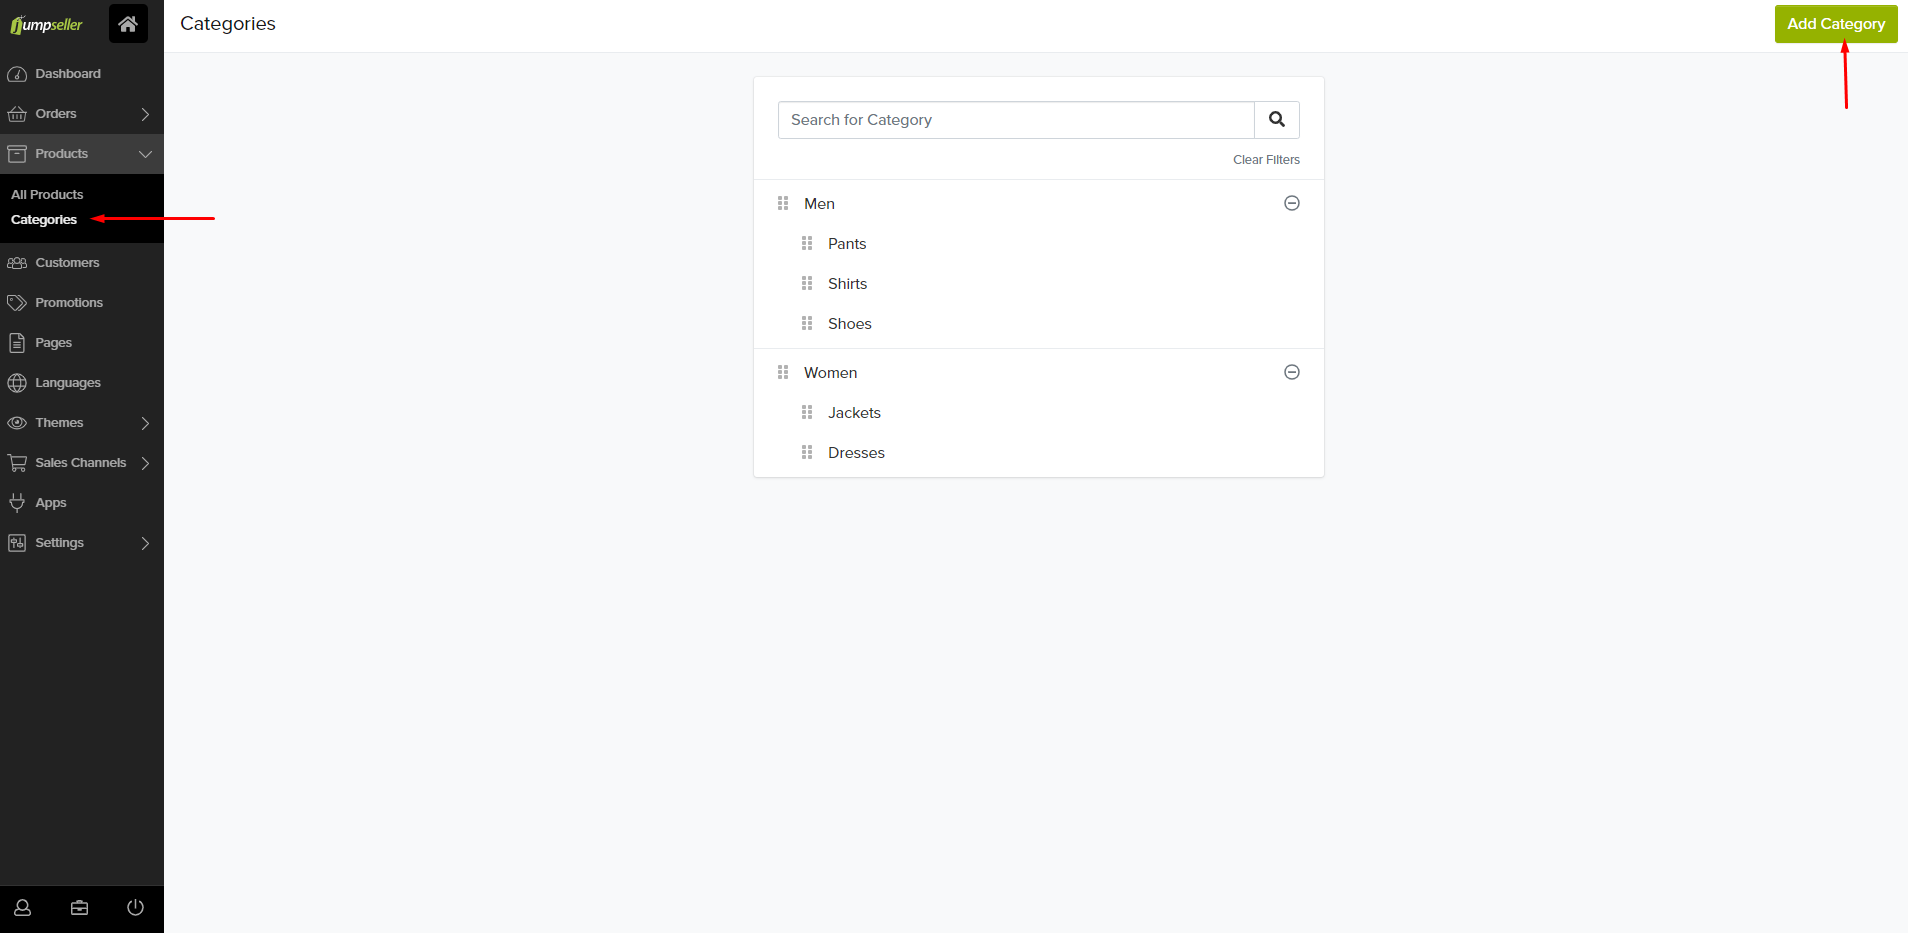
Add a category name and description. The description isn’t used in all themes; it may serve as the meta description if you don’t set one.
To add an image to a category page, upload one in the Image section:

The category image appears on top of the category page in most themes (not in Megami, Industrial, or Bootstrap themes).
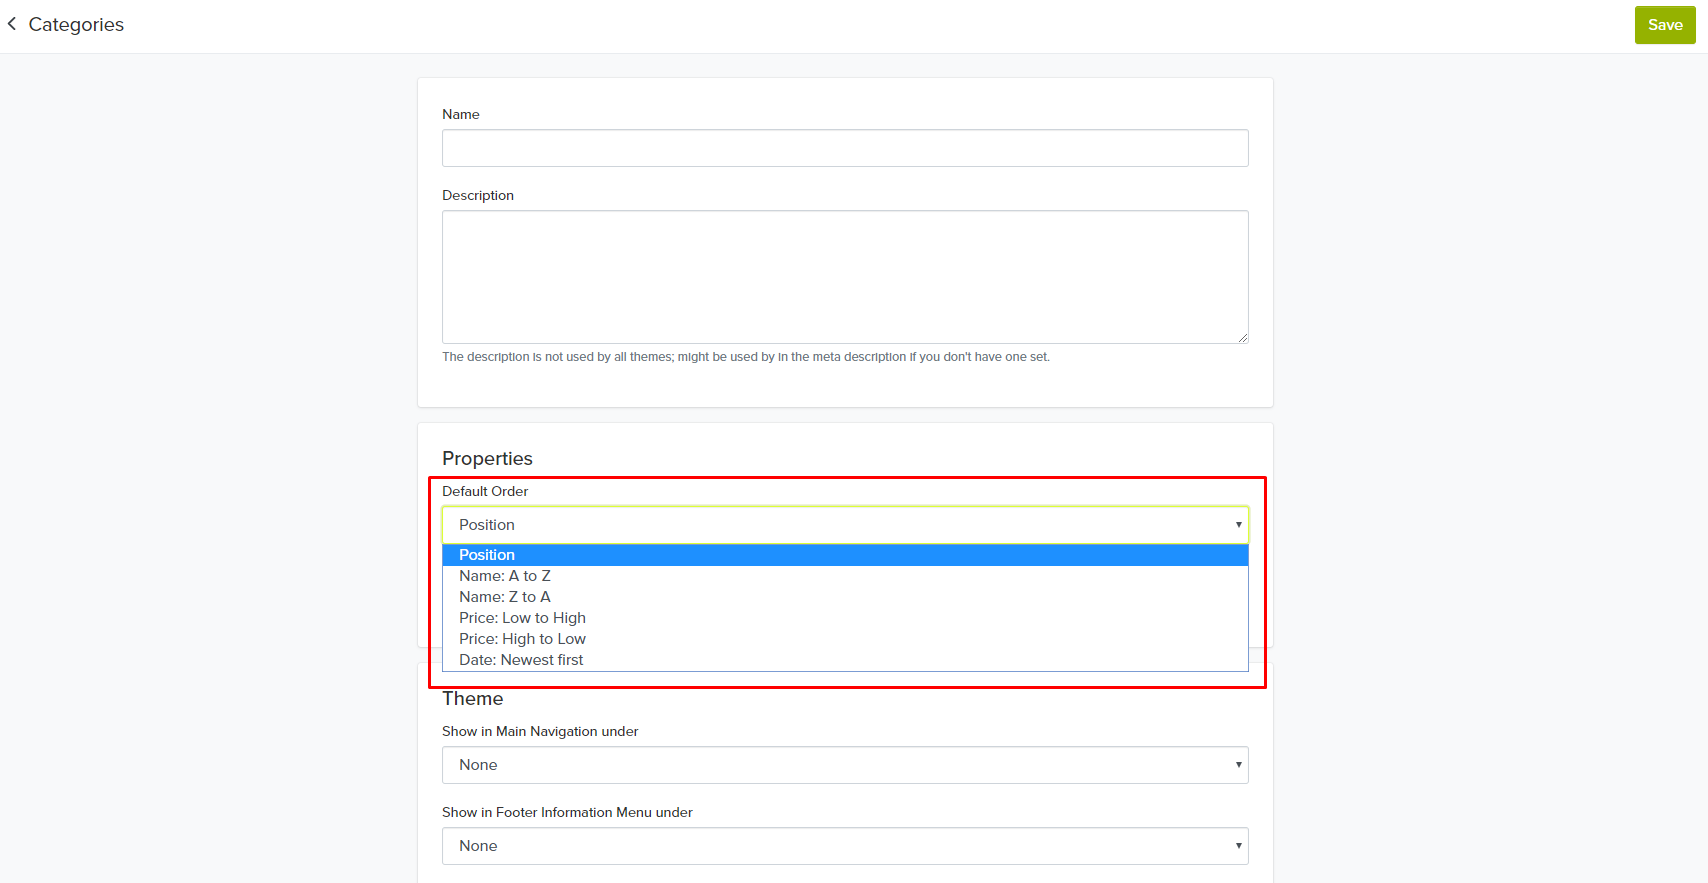
Assign a Default Order for the products in that category.
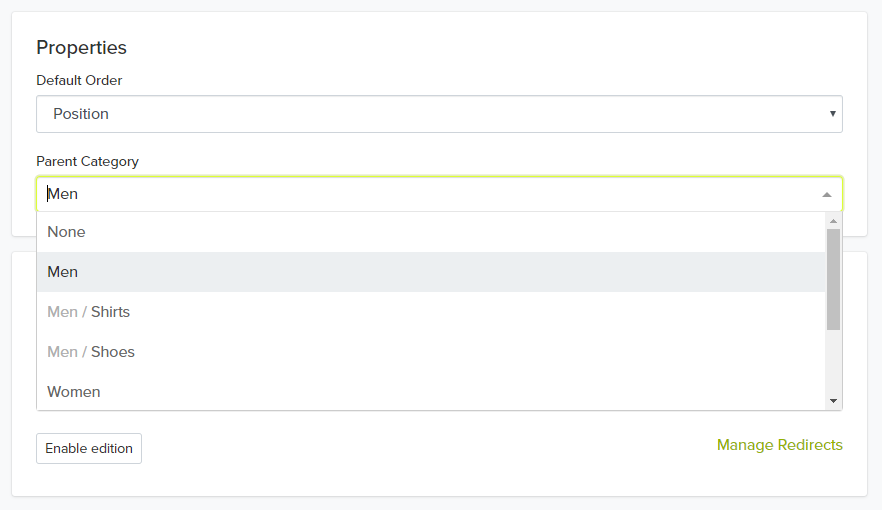
You can also assign a Parent Category (it must already exist to appear in the list).
The category form has a Navigation section where you choose where the category appears: Show in Main Menu under, Show in Categories Menu under, and Show in Footer Menu — each lets you place it at the top level or nested under a parent.
You can also manage the whole menu from Admin Panel > Theme > Navigation.
Reorder menu categories by dragging. To make one a subcategory of another, drag it under the main category and move it to the right.
Learn more about the main navigation menu.
If you choose the default order Position, products appear in the category page in the order of the product-list page. Change their position by dragging in the product list:
If you created products before a category existed, add the category to them in bulk from the products-list page instead of one by one:
Some theme elements (banners, buttons, images) can link to a category page. To get the permalink, go to Admin Panel > Products > Categories, open the category, and scroll to Search Engine Optimization where the permalink is shown. Paste it into the theme option to connect the element to the category page.

Tips for effective categorization: be specific, keep it simple, consider SEO, build a logical hierarchy, stay consistent, and use product attributes (brand, size, color) for subcategories. The more logical your structure, the better collaborative filtering and proximity search work for your customers.
In the Pricing section of each product you set the selling price. You can manage prices one product at a time, or in bulk across your whole catalog from Products > Pricing.

The pricing page lets you bulk-edit prices, set comparative prices, and track costs. You can filter the table by product name, category, or product filter (With Stock, Low Stock, Without Stock, Recent), and clear all filters with one click.

The table columns are Product, Min. Quantity, Unit Price, Compare at Price, and Cost — you can edit the editable values inline per product:
To change many products at once:
Click Actions and choose which field to change — Price, Compare at Price, or Cost per item.

Choose Set to (same value for all), Increase by (a percentage), or Decrease by (a percentage).

“Compare at Price” enhances pricing transparency: it displays a reference price next to your actual price, giving customers context for the value they’re getting.

Just input the reference price when creating or updating the product.

For products with variants — like each sneaker size/color — the Compare at Price must be added to each variant individually. Go to the Variants section and select Show Full Results for the expanded screen.


If you have a batch of reference prices, import them. Note that when sorting collections, Jumpseller prioritizes the actual selling price, not the Compare at Price.
Note: Promotions override Compare at Price. If a product has an active promotion and a Compare at Price, the discount shown is based on the promotion.
Scenario 1 — Compare at Price only. Price $10, Compare at Price $100. The system displays $10.00, shows $100.00, and calculates 90% OFF.

Scenario 2 — Active promotion + Compare at Price. Price $10, Compare at Price $100, plus a 15% promotion. The promotion takes priority, the system ignores the Compare at Price, and shows $8.50 $10.00 (15% OFF).

In the pricing section you can add the cost price — the original purchase or production cost.

This is visible only to the store owner. It shows your profit margin per product. To see it, go to Admin Panel > Analytics > Reports and check the Profit (margin) column.

For products with variants, enter the cost for each variant via Show Full Results in the Variants section.

At the top right of the Pricing page, Price Lists lets you set custom prices for specific customer categories — useful for B2B or loyal customers. Learn more in the B2B documentation.
Volume Pricing offers tiered discounts based on quantity, automatically adjusting the unit price as customers add more to the cart — ideal for wholesalers. (Available on the Advanced Plan and above.) Learn how to configure Volume Pricing.
Precise stock tracking ensures you always meet demand without overselling. Every product and variant has an Inventory on Stock field, shown directly on the product page (tick the box to set an unlimited quantity). This matters for the sneakers (real units per size/color), but not for the online course — a digital product has nothing to count.
There are three statuses in Jumpseller:

Every order automatically affects current stock. Inventory changes based on order transitions:
View stock changes at the bottom of a specific order, or click the clock icon next to a variant field for its full stock history.
Products > Inventory is your central dashboard for bulk stock control. You can update individual variants in the list, select a Location (if Multi-Location Inventory is enabled), and run bulk actions to increase/decrease units, limit/unlimit stock, or edit SKUs.
Set a minimum level to get notified before running out:
For large catalogs or frequent stock changes, the specialized Inventory CSV is much faster than the main product import — it’s optimized solely for stock levels.
Pro tip: If you use Excel, keep your data in an
.xlsxfile and use Google Sheets for the final “Save as CSV” step to ensure correct encoding.
Product Options let you offer variations — color, size, material — that generate variants, each with its own SKU, price, stock, weight, and images. This is the heart of the sneakers example: a size × color grid where each combination is a real, countable variant.

To add an option, scroll to Product Options when adding or editing a product, click Add Product Options, then choose the type:


Colors — customers see a color palette and preview before buying. Generates variants with their own inventory and price.
After adding your options, click Save. Here’s how it looks on the storefront:

Each variant can have its own price tied to stock. If you had fewer pink sneakers in stock and wanted a higher margin on scarcity, you could raise that variant’s price from $65 to $70. The variant price shows when the customer selects that set of attributes; category pages display the main price.

Two ways to attach images to variants. First, the Choose or Drag a File Here option next to the product images — upload, then pick which variant the image belongs to (e.g. the small white t-shirt).

Second, click the small image icon next to a specific variant and select from images you’ve already uploaded.

Looking to offer optional paid extras like gift wrapping or extended warranties without creating new variants? Check out Product Add-ons.
If you hit an error adding variants, you’ve exceeded the limit of 100 variants per product. This limit can’t be raised on any plan.
Usually each variant has its own stock. But sometimes that doesn’t make sense — like the cake’s flavor, or a basic t-shirt where you choose which side a logo goes on. If you have 10 t-shirts, it’s wrong to say “5 front-logo, 5 back-logo”: the logo is only set after the customer chooses, not before.
To display an option without a per-variant stock value:
Find this snippet (use Ctrl+F):
{% elsif option.type == 'text' %}
Below it, write (replace “Logo Position” with your option’s name):
{% elsif option.type == 'text' %}
{% unless option.name == 'Logo Position'%}
After the <div class="field-group">…</div> block, write:
{%else%}
	{% assign custom_options = option.values.first.name | split: "," %}
	<select>
	{% for value in custom_options %}
	<option> {{value}}</option>
	{%endfor%}
	</select>

{%endunless%}
Which displays like this:

You can also check the Liquid template documentation.
Custom Fields store extra information about a product that won’t generate a variant. A t-shirt can have several sizes (variants) but only one brand (custom field). For our cake, fields like “occasion” or “allergens” are perfect — descriptive, but not something to count stock for.
Custom fields display slightly differently per theme. In Mega Theme:

In Simple Theme:

Advanced use: Custom fields can drive extra functionality in code. For example, a “Regions” select list could show a flag icon on the product page depending on the selected region. Learn how to use custom fields in snippets.

Click Add Custom Fields, then Manage Fields to open the Custom Fields manager. There you add a Label, pick a Type, and set its Visibility (whether it shows on the product page). The manager lists every field shared across your store.

If it’s a Selection field, add its values:
You can associate variants with custom fields. Text Input and Text apply to all variants automatically. A Selection field can be detailed per variant (by default it applies to all). Because a selection field can hold multiple values, you can add it up to n times (n = number of available value options).

In the example below, when “Model” is added once all four options are available; add it a second time and “Mini” (already used) is no longer offered.


Our cake needs a delivery date, and a course might need a session date. You can add a customizable date/time picker with the Flatpickr JavaScript library so customers schedule orders within your business rules (holidays, business hours).
Use JavaScript responsibly: Implementing custom JavaScript without a technical background can introduce security and UX issues. We recommend getting help from professional web developers.
Requirements — add Flatpickr’s CSS and JS to the head of your Layout Template:
<link rel="stylesheet" href="https://cdn.jsdelivr.net/npm/flatpickr/dist/flatpickr.min.css">
<script src="https://cdn.jsdelivr.net/npm/flatpickr"></script>
Usage — create a product option of type Text Field named Date (this field stays hidden). Then add a picker input to your product template (compatible with any Bootstrap-based theme):
<div class="col-12 col-md-6">
<label for="datetimepicker" class="form-control-label">Select Date</label>
<input type="text" id="datetimepicker" name="datetimepicker">
</div>
The code — this hides the Date label, sets a minimum date based on the current time, blocks holidays and Sundays, restricts to business hours, and writes the chosen value into the hidden Date field:
<script>
// Hides the input that contains the Date Label
document.addEventListener("DOMContentLoaded", function() {
    const labels = document.getElementsByTagName("label");
    for (const label of labels) {
        if (label.textContent.trim() === "Date") {
            const containingDiv = label.parentElement;
            if (containingDiv) {
                containingDiv.style.display = "none";
            }
        }
    }
});

// Get today's date and time
var today = new Date();
var currentHour = today.getHours();
var currentMinute = today.getMinutes();

// Calculate the minimum date based on current time
var minDate;
if (currentHour >= 17) {
    minDate = new Date(today.getFullYear(), today.getMonth(), today.getDate() + 2);
} else {
    minDate = new Date(today.getFullYear(), today.getMonth(), today.getDate() + 1);
}

// Set up the holiday dates to be blocked
var holidays = [
    "2022-09-16",
    "2022-11-19",
    "2022-12-24"
];

// Initialize the Flatpickr date time picker with Spanish locale and Monday as the first day of the week
flatpickr("#datetimepicker", {
    enableTime: true, // Enable time selection
    dateFormat: "Y-m-d H:i:S", // Set the custom date and time format
    time_24hr: true, // Use 24-hour time format
    minDate: minDate, // Set the minimum selectable date
    disable: [
        function(date) {
            // Disable Sundays
            return date.getDay() === 0;
        }
    ].concat(holidays), // Disable Sundays and the specified holiday dates
    minTime: "09:00", // Set the starting business hours
    maxTime: "18:00", // Set the closing business hours
    hourIncrement: 1, // Set the hour increment to 1
    weekNumbers: true, // Display week numbers
    locale: { // Set the locale to Spanish and translate weekdays and months
        firstDayOfWeek: 1,
        weekdays: {
            shorthand: ["Dom", "Lun", "Mar", "Mié", "Jue", "Vie", "Sáb"],
            longhand: [
                "Domingo",
                "Lunes",
                "Martes",
                "Miércoles",
                "Jueves",
                "Viernes",
                "Sábado"
            ]
        },
        months: {
            shorthand: [
                "Ene", "Feb", "Mar", "Abr", "May", "Jun",
                "Jul", "Ago", "Sep", "Oct", "Nov", "Dic"
            ],
            longhand: [
                "Enero", "Febrero", "Marzo", "Abril", "Mayo", "Junio",
                "Julio", "Agosto", "Septiembre", "Octubre", "Noviembre", "Diciembre"
            ]
        }
    },
    onChange: function(selectedDates, dateStr, instance) {
        // Update the hidden input with the selected date when it changes
        $("label:contains('Date') + div input").val(dateStr);
    }
});
</script>
This is where the bulk of your persuasive content lives. The goal is to help customers know exactly what to expect (which reduces returns), determine whether the product fits their needs, and answer their questions before they have to ask.
Our description editor lets you enrich listings with HTML, widgets, files, and more. It’s optional but it significantly improves the appeal and clarity of a listing.

Built on ChatGPT, our generative AI takes basic inputs (name, categories, a brief description) and produces unique, SEO-optimized descriptions.
Note: Available to subscribers of the Plus plan and above.

AI brings scalability (large catalogs), consistency (uniform tone), SEO optimization, and creativity. For best results: give detailed inputs, know your target audience, keep your brand voice, highlight key features, include SEO keywords, and always review and edit the output.
The Properties section is for identifying the product: add a SKU, Brand, Barcode (e.g. GTIN, UPC), and the Google Product Category (used for Google Shopping and Facebook integration). Price lives in the Pricing section and stock in the Stock section, both covered above.

Tag a product as Featured to display it prominently — for example, in your homepage slideshow — depending on your theme.

Add a Minimum or Maximum quantity required to complete a purchase.

Min and max quantity apply at the product level — if a product has variants, the limits apply across all variants. You can’t set them per variant.
If a buyer doesn’t meet the requirement, they can’t proceed, and a small message explains what’s needed.


Enable this to display a “Quote” button on the product page, whether the item is in stock or not.


Customers gather multiple products, adjust quantities, and submit a quotation form sent to your contact email with full product details — helping you respond faster and close more sales.
If you sell digital products — eBooks, software, music, or our online course — set the Product Type to Digital or Service (the radio next to “Physical”). This replaces the shipping fields with a file upload, so you can attach private files that are delivered to the customer only after purchase.
To add a digital product, e.g. an eBook:
Go to Products > All Products and click Add Product.

Add the product name and description, and optionally a category.

Add an image on the right side.

Add Properties. Without product options you set SKU and Stock here; with options, you set them per option instead.

In the Product Type section, select Digital or Service.

Choose or drag a file to upload, or provide an external link to the file.

Optionally add variants tied to files — e.g. the course in English and Spanish — and choose which variant each file applies to.


Done — the product is visible in your Admin Panel and store.

Success page — the landing page right after purchase, where the product can be downloaded.

Email — after the order is placed and paid, an email is sent with the download link.

You control your product fully. Set a maximum number of downloads and a maximum number of days customers can download it: go to Settings > Checkout > Digital Products.

Note: These settings apply only to files you upload directly. For external links, managing expiration and download limits is your responsibility.
For physical products like the sneakers, edit shipping properties — package format, weight, width, height, and length. These are used to estimate shipping cost at checkout. For digital products there’s no shipping; you just upload a file.


If you have extra information in an external file (for example, a care guide or a PDF spec sheet), upload it here and it appears as a downloadable option on the product page — a great trust-builder.

Your store is already SEO-friendly, but you still add the data Google needs to index each page well. In the Search Result Preview section, click Enable edition and set the Page Title, Meta Description, and URL.


SEO for a product page comes down to a few fundamentals:
The fields above control what a product page contains. How it looks — the layout, the order of sections, and which components appear — is controlled by your theme’s Product template in the Visual Editor.

For the full walkthrough — theme settings, the template manager, and every component option — see the Visual Theme Editor guide. To customize the page with code, see Liquid HTML for products.
These fields all sound great — but how do you know which ones to prioritize? You ask, and you test.
Talk to your customers: people who bought from you, people who fit your target profile but haven’t bought yet, and people who bought from a competitor instead. Ask them to look at the page and say out loud every question and doubt that comes to mind. You’ll find the same concerns coming up again and again — and those are exactly the things to answer in your description, images, and options.
Then test changes with a tool you trust. But don’t waste time tweaking button colors or swapping single photos if the real problem is that the page hasn’t answered the customer’s core questions. Form a hypothesis about what’s stopping people from buying — grounded in real research — and fix that.
Do these things and you’ll have the best product page on your store.
Once the basics are set, these features take a product page further. Each has its own guide:
How do I manage the stock of my products? Edit stock in your Admin Panel for simple control, or for large catalogs use Import/Export to CSV (export first, edit without changing the file structure, then re-upload). See Stock and inventory above for the full workflow.
How can I add a video to my product? Embed it in the description:

Start your free 7-day trial. No credit card required.
