Unlock Insights for your Store: Mastering Jumpseller Dashboard Metrics
Dive deep into customer behavior with Jumpseller dashboard. Learn how to analyze key metrics, optimize your strategy, and boost your online store p...
Extract information from an e-commerce service using an API with pagination restrictions to create a panel on Microsoft Power BI.
This guide is meant for orders in Jumpseller stores but can be used on any token-based API with pagination restrictions.
1. Copy API URL from your Admin Panel: Accounts section, use your own URLs, these are only for testing purposes and are now expired.
Paid Orders:
https://api.jumpseller.com/v1/orders/status/paid.json?login=XXX&authtoken=XXX
All Orders:
https://api.jumpseller.com/v1/orders.json?login=XXX&authtoken=XXX
2. Add pagination parameters to your URL, I picked all orders URL:
https://api.jumpseller.com/v1/orders.json?login=XXX&authtoken=XXX&page=3&limit=100
3. Paste the URL as a Web Query. This will only bring us 100 records, maximum per page. From this base query we will create a function and replace the page number with a parameter “page” so we can loop and get all pages of the store.
4. Left click on the Orders table and create a Function, edit the function adding the page as text argument, and replace the page number (3 on this example) with the parameter page.
5. Now we need to create a table that contains all of the paginated information, we will start with this function to generate a table with only one column for the pages (Only three pages on this example, this will return a maximum of 300 orders, you are free to add more):
	=
	Table.TransformColumnTypes(Table.FromRows({{1},{2},{3}},{"page"}),{{"page",type text}})
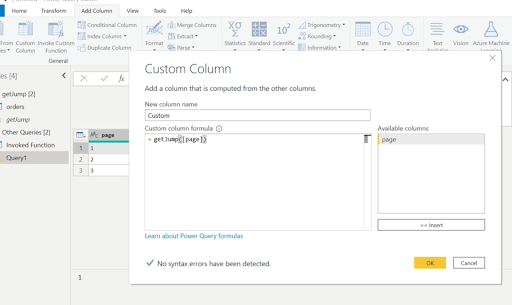
6. Go to Add Column and then Custom Column, apply the function to the page value, it will create a column with pages on its values, the final step is to expand.

7. Create your dashboard.

Start your free 7-day trial. No credit card required.